Friday 28 July 2017

house pillow diy craft camp part 5


pic 1
pic 2

pic 3

pic 4

pic 5

pic 6

pic 7
pic 8


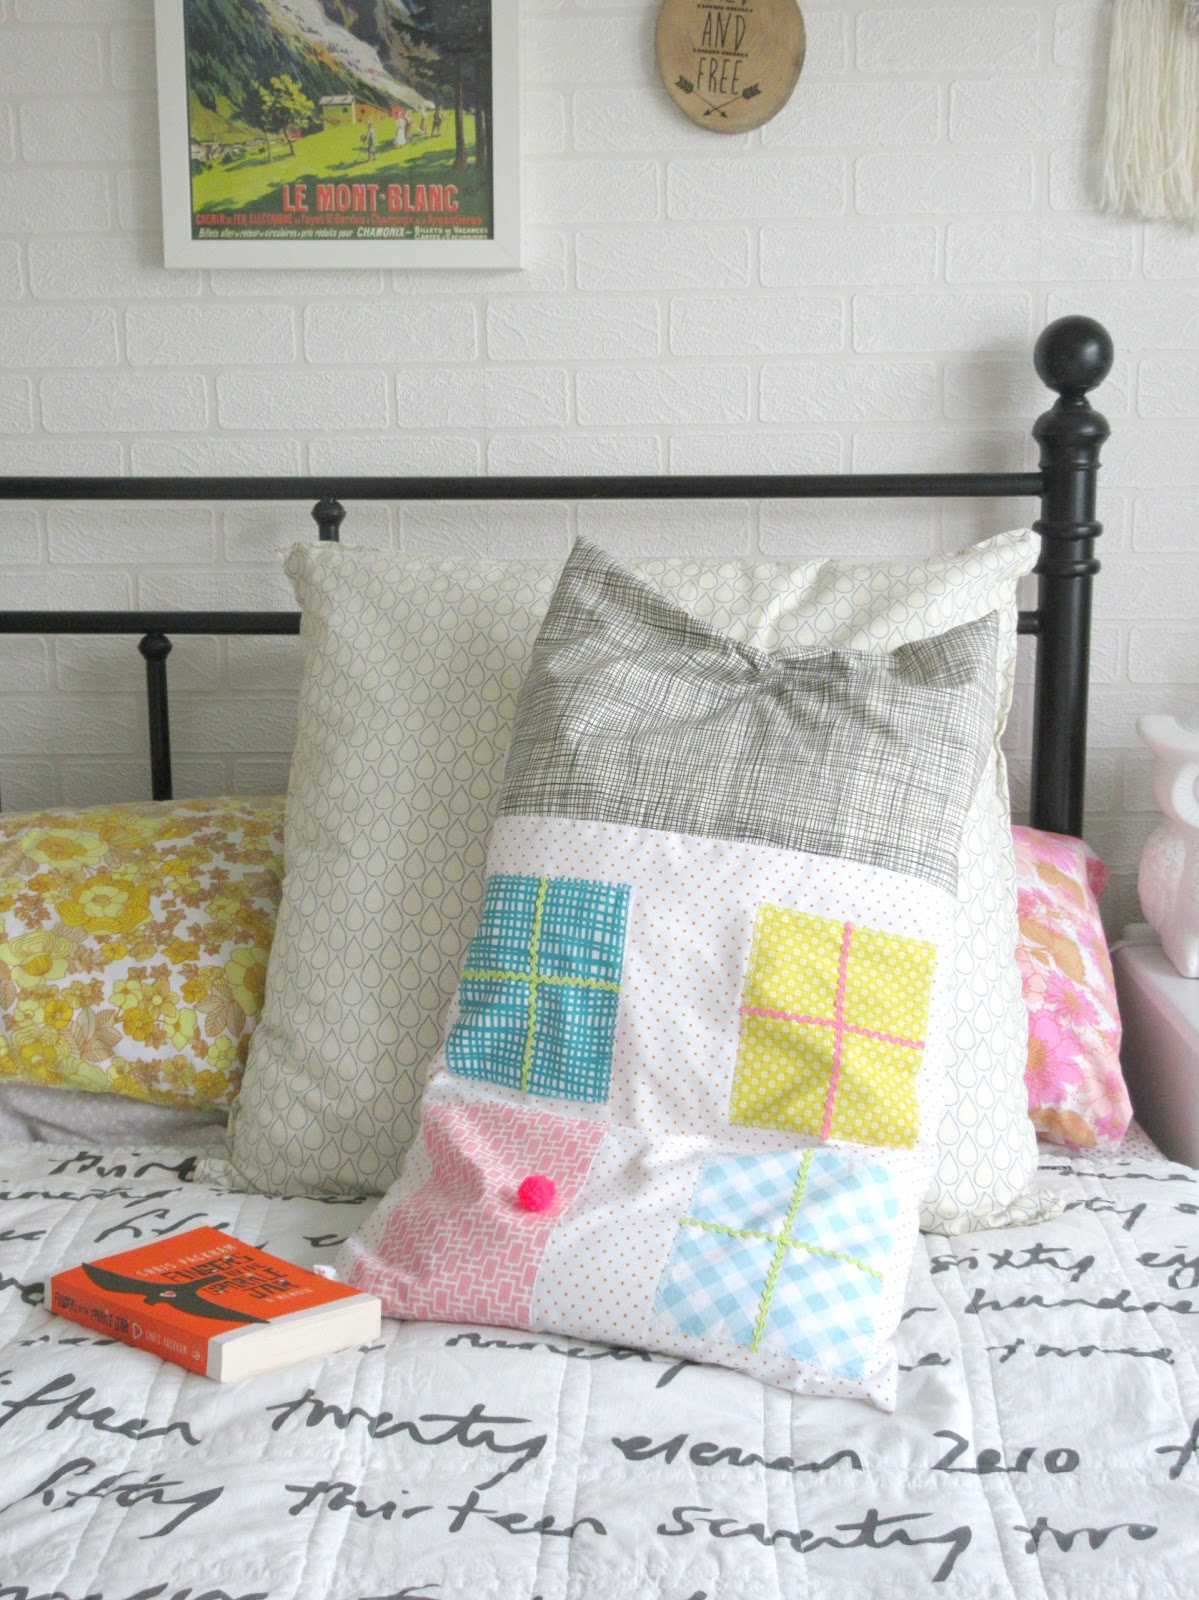
ok so here is the last DIY for craft camp week..a little house pillow for reading in bed.It would make a great addition to a reading corner or den or looks great on a bed! (and yes I did buy that book because I liked the cover but I'm hoping it lives up to it's looks)
you will need sewing skills for this so not one just for little people but...they can choose the colours/fabrics and cut out and design/plan the windows etc and of course enjoy it once it is made.

you will need
- a pillow (40 x 70cm) this was the size I had, so the fabric measurements are relating to this if your pillow is bigger or smaller you will need to measure it and adjust the measurements accordingly...it won't matter though if the cover is a little small or big...pillows are quite forgiving
- fabric scraps x 4 for windows etc
- ric rac trim
- pom pom/button (optional)
- scissors
- pins
- iron/board
-sewing machine/thread
- 1 piece of fabric for main front part 46cm x42cm
- 1 piece of fabric for roof  28cm x 42cm
- 1 piece of fabric for large back panel 60cm x 42cm
- 1 piece of fabric for small back panel 34cm x 42cm

- cut out all the pieces of fabric and lay the front pieces on a table, cut out three rectangles for windows and one longer rectangle for the door (pic 1)
- take the roof piece and the main piece and place right sides together along the width of the fabric. -Sew a 1cm seam along this edge to join the two pieces together (pic 2) press flat
- pin the windows/door in place and cut the ric rac to fit inside the windows (pic 3/4) stitch them all down. You can use a zig zag stitch here to keep the raw edges from fraying as much.
- take one of the back panels,along one of the 42cm widths fold the edge over twice and stitch down to make a hem, repeat with the other back panel. (pic 5) press flat.
- place the house front piece right side facing upwards on a table lay the larger back panel on top right side down and then place the smaller panel right side down on the remaining part, they should overlap approx 10 - 12cm (pic 6) pin in place and sew a 1cm hem all around the edges to make the cover.(pic 7) I overlocked the edges to stop them fraying but you can zig zag or use pinking shears to do the same job. Press all the seams and turn the right way out.
- at this point I stitched on a pom pom for a door handle but you could use a button or a circle of fabric/felt.
- Put the pillow inside
note* if you are struggling with my instructions on the envelope back part of this tutorial have a look at this
Other ideas... you can make this in any size or shape, add more windows, do a version of your house or apartment or make a favourite building. You could make the windows in to pockets by not sewing the top edge down, if you lay the pillow the other way you could do a really cool retro bungalow. You could add curtains and more detail or keep it really simple. If your sewing skills aren't up to this you could just customise a ready made pillowcase and glue the windows on.

Remember all these projects are just for fun and don't have to be perfect, do your own thing and enjoy...share your pics over on instagram if you make any.
Hope you have enjoyed craft camp, I've loved making these projects, once again apologies for any mistakes, these were all thought up, made, photographed and written up in a few days and in a hurry between my work and family jobs but hopefully they have inspired some crafty adventures this summer :)

Thanks for reading x x
 

Thursday 27 July 2017

woven mobile diy craft camp part 4


pic 1

pic 2

pic 3

pic 4

pic 5

pic 6

pic 7

pic 8

pic 9

pic 10

pic 11

A classic summer camp craft is the Gods Eye or Ojo de Dios...they look great in bright colours or simple natural tones and you can adapt them to suit your own style. There are lots of tutorials on the Internet for these, if you need more instructions it might be worth looking here as mine are quite basic. Big or small they look great hanging inside or out. This D I Y is for a mobile and you will need:
- wool in your favourite colours
- string
- kebab sticks
- a wooden stick/twig
- scissors

- to make the cross cut the kebab sticks down to shorter lengths, cut 5 pairs (each pair should be the same length) but you can vary the size of each cross. My 5 crosses vary from 15cm to 8cm.Take one pair of sticks and tie a piece of wool around both in the centre, knot tightly. Open the sticks out to form a cross. (pic 1)
- with a new colour, start wrapping the wool around the sticks, you can wind under or over for different effects (pic 2 is over pic 3 is under)when you are happy with the look, tie the ends in a secure knot.You can cover the cut ends with the next layer for a neater look.
- continue with different colours, if you prefer a simpler version just use 1 or 2 colours
- when you get to the last layer wind the wool a few times round each stick to give a neater finish and then knot tightly and cut. (pic 4 /5)
- make 4 more crosses and weave them as above, you can leave gaps between each colours and wind under and over to make them look different.
- when you have made all 5, cut 5 pieces of string in various lengths and tie one end to each gods eye,
tie the other ends to the wooden stick and then cut another piece of string 30 cm long and tie to each end of the stick.

other versions and ideas...you can use small twigs or lolly sticks and sticks instead of kebab sticks.  You can use fabric strips or add beads or charms ( I had some wooden beads which fitted onto the sticks so I added them)  You can make huge versions with bigger sticks and just hang them individually. They look lovely on a wall in a group and also outside in trees. Perfect for camping holidays or back gardens. Or you can hang them in windows.

have fun and share your photos if you do make some :)
thanks for reading x x 

Wednesday 26 July 2017

word banner craft camp part 3


pic 1


pic 2

pic 3
pic 4

pic 5

pic 6

pic 7

pic 8

pic 9


another d i y today, this time a banner for your wall. Very popular at the moment but here you can make one with your own favourite colours and sayings.
you will need
- a piece of medium weight fabric size approx 40 x 30cm (mine was a brushed craft cotton)
- felt in various colours
- scissors
- wooden stick measuring 30cm in length
- wool
- string
- needle/thread
- glue gun / or PVA glue
- pom pom maker (optional)
- sewing machine (optional)
- Cut the fabric in to a rectangle measuring 40cm  x 26cm, with the shorter length as the width cut a point in to the bottom hem. choose your words and count out the letters, short words work best, 2-3 lines max. cut out different coloured squares to match the amount of letters, (pic 2)this helps to keep them all the same size, next cut out each letter of your words.(pic 3) They don't have to be super neat and you can leave solid shapes in some letters. Glue the letters on to the fabric banner. 
- Make some tassels by wrapping wool around your hand, (pic 4)cut across the loop to form strips of wool, lay on a flat surface and take a piece of the same wool and tie it in the centre (pic 5) fold the wool in half and then with some more wool wrap around the top to form a tassel tie securely (pic 6)  trim the ends to the same length. Make a few more tassels (pic 7) and if you have a pom pom maker add some pom poms in different colours. If you don't have a gadget to make them you can see a tutorial here
- Fold over the top edge of the banner to make a 4cm hem,  sew a running stitch along the top making sure to leave a big enough gap for the stick to fit through (pic 8) I machine stitched this part as I had my machine there on my table but hand stitching is fine also. Feed the stick through the gap.
- using a needle and thread stitch the pom poms and tassels on to the banner. (pic 9)
- cut a piece of string 30cm long and tie around each end of the wooden stick to make the hanger.

Other ideas, you could use felt for the whole banner, use just one colour for the words. You could make mini versions with initials on or a shape like a star or heart etc. If you don't have felt you can use fabric scraps for the letters or use a patterned fabric for the banner.
Have fun
Thanks for reading x x 

Tuesday 25 July 2017

pom pom cactus DIY


Add caption
pic 1

pic 2

pic 3

Add caption
so here are the little guys that go inside the pots from the previous post... super easy and cute!
here's how....

you will need
-large pom pom maker (mine is a clover one, I used the green size)
-green wool
-mini pom poms
-glue gun
-scissors

- make three pom poms (I made the pom poms bigger than the pots so I could trim them to shape) if you don't have a pom pom maker you can use this tutorial  trim them down to be slightly larger than the pots they are going in, make them more of an oval shape than round to look more cactus like. (pic 1)
- take three or four of the mini pom poms and attach to the top of the big pom poms using the glue gun (pic 2/3)
- place inside the pot and push down so it stays put
Have fun!!

thanks for reading x x

Clay face pots DIY

pic 1
pic 2
pic 3

pic 4
pic 5
pic 6


hello!! here is the first instalment of craft camp...a short run of D I Y's to keep little and big hands busy this summer. Before I begin I must add that his has been an idea brewing for a few years but I have always run out of time...this year I'm determined to get these posted so I apologise now if they are a little rushed/photos are bad/no punctuation/not explained properly. The thought was to get the ideas out there in time for summer holidays (I know I'm late and some have been off for weeks already) and hopefully inspire some activities this holiday when boredom strikes. Where possible I have linked to good websites that offer a more in depth description of some of the crafts. Hopefully you will be inspired and have a go!

You will need
- a pack of air drying clay in white (mine was from hobbycraft £3.50 and it made 6 small pots)
- rolling pin
- board or mat with a smooth surface
- knife, smooth edge/doesn't have to be super sharp
- paints ( I use acrylic in bright colours)
- paintbrushes
- clear varnish spray

- to make a pot, pull off a piece of clay the size of a small apple. Roll in to a strip making sure the depth/thickness is no less than 0.5cm (pic 1)
- cut along all the edges with the knife to straighten  and roll up into a cylinder shape (pic 2) put the remaining bits of clay to one side
- press the two edges together to join, try not to press too hard so the clay keeps it's shape (pic 3)
- using the clay you put to one side, roll in to a ball and roll out into a circle 0.5cm thickness, place underneath the cylinder and cut away the excess clay. Smooth the edges and make sure it is attached. (pic 4)
- make 2 more pots in different sizes and put in a warm dry place to set for approx 24 hours ( or however long the instructions say)
- when dry decorate the pots using the acrylic paints...I didn't paint the pots a solid colour first as I didn't have time and the clay was a nice grey/white colour but you can do this first if you prefer. (pic 5/6)
- when the paint is dry you can add a clear coat of varnish to seal in the colour and make them more durable but this is optional, if you keep them dry they will be fine as is.

finally you need something to put in them... but that's the next tutorial so check back soon!!!


coming soon, for the holidays...d i y crafts for little and big hands